Limit Google Chrome memory usage: Google Chrome is the best and most powerful browser, and there are no arguments here! Millions of users rely on Chrome for their day-to-day browsing activities. As most of you already know, Google Chrome runs on Chromium. Microsoft has also moved its popular Microsoft Edge to the Chromium Engine. Despite being powerful and reliable, Google Chrome’s biggest complaint is that it uses a lot of RAM. It eats up plenty of RAM by just running the background on the off chance!
So, are you a Google Chrome user and are facing the same issue? Well, do not worry; this post will guide you on how to limit Google Chrome memory usage and free up RAM. But before we get started, have you ever wondered why Chrome uses so much RAM? Let us find out, shall we?
Why Chrome uses a lot of RAM?
This is the technical part, but we’ll keep it simple. Well, imagine a scenario where you use your smartphone. You can run several apps in the background, depending on the RAM of your phone. You can browse social media, minimize, and play music on Spotify. You can check your emails and browse through web pages. Now, at some point, you will face a bit of lag, which is caused by a lot of apps running in the background.
While the Android system will remove the apps and processes from the background once RAM fills up, you can manually close apps by swiping from the recent panel. Now, just like that, when you open Chrome and browse through different tabs and extensions, Chrome splits every tab and extension into its process. This is useful because if one thing crashes, it does not bring down the whole webpage or tabs at once.
Do note that a lot of stuff is happening behind the scenes here. For starters, Chrome’s pre-rendering feature can cause higher memory usage, but on the bright side, it makes your web pages load faster. Also, note that the more tabs and extensions you have installed, the more memory usage you will have. So, it is recommended that you keep only the extensions you use daily. Let us quickly jump into how to limit Google Chrome memory usage and free up RAM, shall we?
How to limit Google Chrome memory usage and free up RAM
As mentioned earlier, most of the time, Chrome uses all the RAM for a required process to help you in better usability. So, saving your data and closing Chrome is recommended before performing any of the steps below.
1. Close unused Tabs to limit Google Chrome memory usage

As mentioned earlier, the more tabs you open in Google Chrome the more RAM it uses for its processes. So if you observe that Chrome is acting up by taking a lot of RAM, you can open it and close all the unwanted open tabs. Sometimes, closing certain web pages releases a huge chunk of RAM. To do so:
- Open Google Chrome and check for any unwanted tabs that are opened.
- Now, navigate to the tab with your cursor and click on the (x) or close button on the right side of the tab.
- That’s it; now you can see a lot of RAM recovering.
2. Enable Hardware Acceleration to limit Google Chrome memory usage

- Open Google Chrome and click on the Menu button. For those unaware, the Menu button is located in the top right corner of your screen in the form of three dots.
- Now, click and open Settings.
- Once the settings page opens, scroll down to the bottom and see a button labelled Advanced Settings.
- Click on that Advanced Settings button and once it opens, under the System settings, find and turn on the toggle of Use hardware acceleration when available.
- Now, quickly close the Google Chrome application and open it back again.
- When Google Chrome fully opens up, navigate to the address bar and type chrome://gpu/ (or you can copy-paste), and hit enter.
- This will now display whether the hardware acceleration or GPU Rendering is enabled.
3. Remove or Disable unwanted Browser Extensions Tabs to limit Google Chrome memory usage
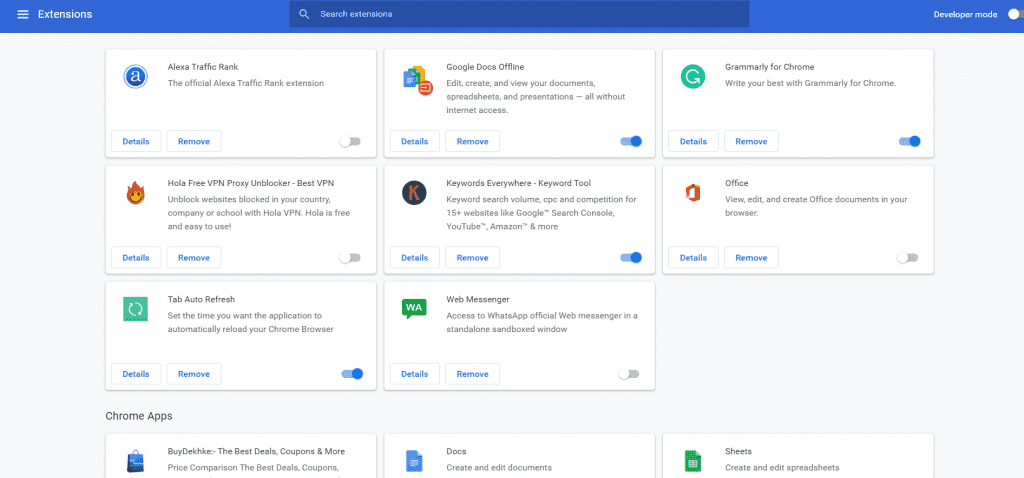
As mentioned earlier, more tabs and extensions you have installed will result in more memory usage. So, it is recommended to uninstall or disable the extension that you haven’t used in a long time. In some cases, the extensions and toolbars used on your browser might conflict with your website’s loading, which burdens your RAM. To remove or disable unwanted browser extensions:
- Open Google Chrome and click on the Menu button. For those unaware, the Menu button is located in the top right corner of your screen in the form of three dots.
- Now, place the cursor on the More tools option, and here you can see Extensions.
- Click on Extensions, and it will take you to a page to find all your installed extensions.
- You can click the remove button to remove all the unwanted extensions.
4. Disable the Site Isolation Feature Tabs to limit Google Chrome memory usage
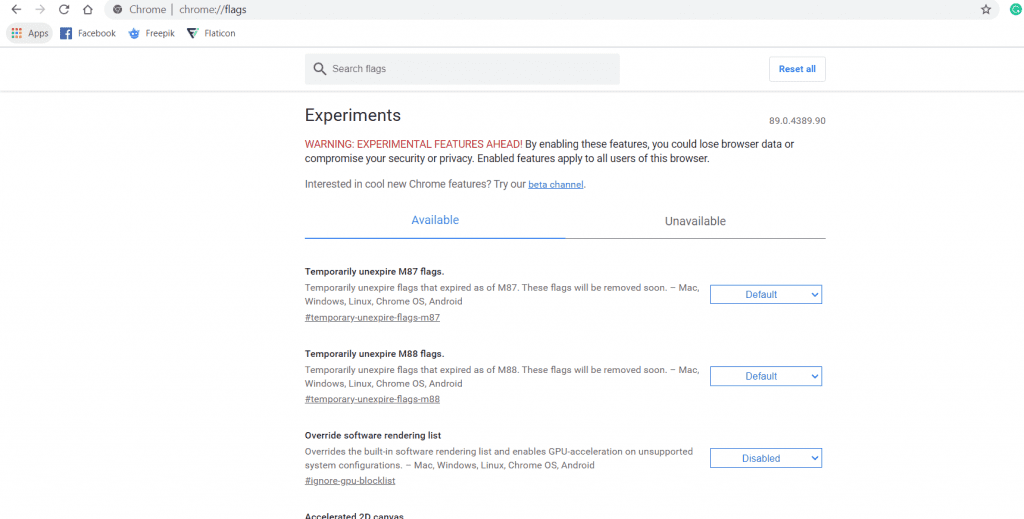
- Open Google Chrome
- Now, navigate to the address bar type chrome://flags (or you can copy-paste), and hit enter.
- Here, look for Strict site isolation in the search box at the top portion of the page.
- Once it’s found, toggle the entry of the option to Enabled. Now, quickly close the Google Chrome application and open it back again.
- That’s it. This will enable the Site Isolation feature on Google Chrome.
5. Turn on Use a Prediction service to load pages more quickly option Tabs to limit Google Chrome memory usage
- Open Google Chrome and click on the Menu button. For those unaware, the Menu button is located in the top right corner of your screen in the form of three dots.
- Now, click and open Settings. Once the settings page opens, scroll down and see a button labelled Use a Prediction service to load pages more quickly.
- Enable it or turn it on.
6. Reset or Reinstall Google Chrome
If you have tried all the steps above and none of them end up working for you, you can uninstall and reinstall Google Chrome to limit Google Chrome memory usage. You can also try resetting Google Chrome, as when you use the Reset feature, the search engine, homepage, etc., will be reset.
Conclusion
Now, this is our take on how to limit Google Chrome memory usage and free up RAM. If this post helped you to limit Google Chrome memory usage, consider sharing this guide with your friends and colleagues for those who might be useful. We at Geekman strive to bring high-quality how-to’s, news, reviews, and best buy guides, so feel free to bookmark us or keep visiting our site. With that said, it’s time for me to bid you adieu; for more tech guides, stay tuned!


