A DNS cache is a temporary storage space where your device or network stores your recently visited website addresses. This helps your device quickly access those websites without asking the DNS servers every time. It saves time and makes things run faster. If you’re trying to access a website that’s working fine, but your browser can’t connect to it, there may be a problem with your DNS cache. The solution is simple – flush the DNS cache, and the website should start working again.
So if you don’t know how to clear the DNS cache on Android devices, we will guide you through clearing the DNS cache and even changing the DNS server.
Clear DNS Cache using Google Chrome
Android users can easily clear the DNS cache using a Chrome URL inside Chrome( The default browser).
To flush the DNS cache on your Android device through Chrome, follow these steps:
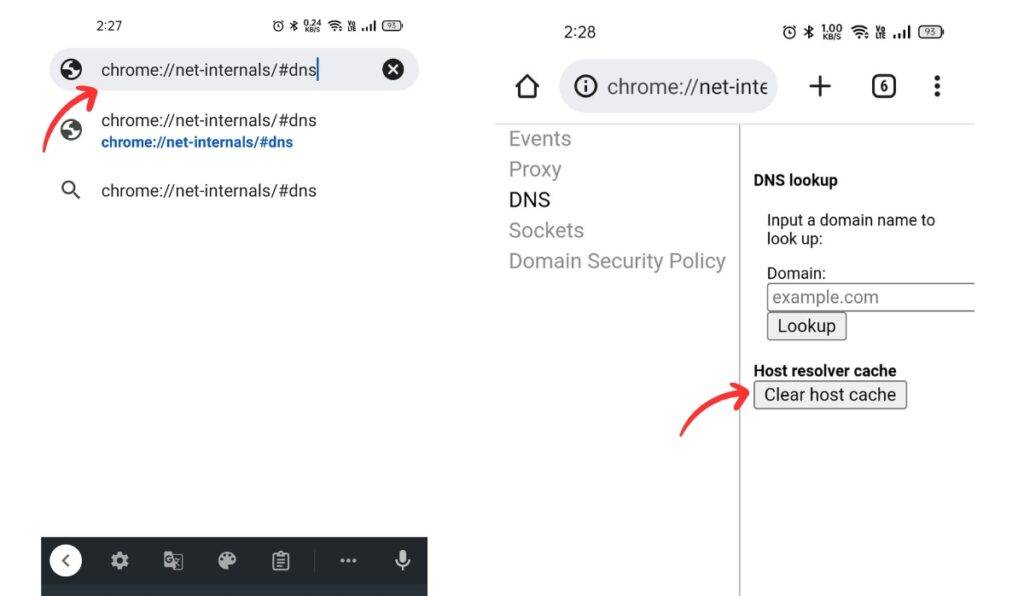
Step 1: Open Chrome on your Android device and type the following path in the address bar:
chrome://net-internals/#dnsPress Enter, and the DNS lookup page will pop up.
Step 3: On the DNS lookup page, tap the “Clear host cache” button to flush the DNS cache stored on your Android device.
Clear the Cache From Chrome’s Settings Page
Along with removing images and files that are stored temporarily, some users have found that emptying the app cache on Chrome can also fix DNS issues. If the previous method doesn’t work for you, try this method.
Clear DNS cache on Android through Chrome settings on your Android device; follow these steps:
Step 1: Tap and hold Chrome on your Android device to open a quick shortcut menu.
Step 2: Select “i” or “App Info” to open Chrome’s app information page.
Step 3: Next, open “Storage usage” and tap “Clear cache” to delete all the local cache stored on your device.

By doing this, you may fix DNS-related issues on your device.
Ways to change the DNS Server on Android
If clearing the DNS cache doesn’t work and the server still can’t resolve the lookup, you can try changing the DNS server. Google added a system-wide DNS setting with the release of Android 9, which makes it easier to change.
On Android 9 and Above
To change the DNS server on your Android device, follow these steps:
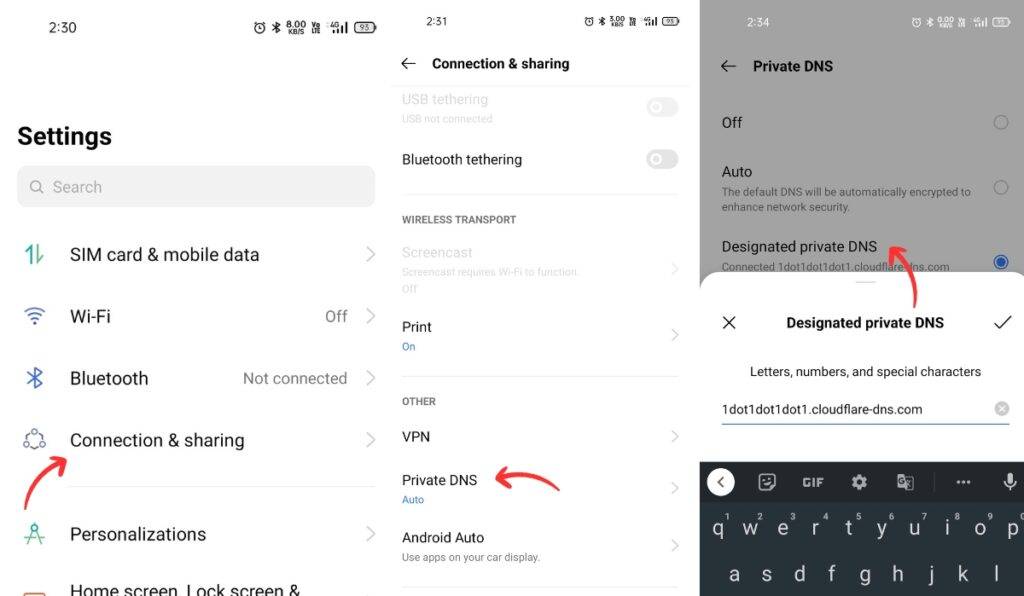
Step 1: Open Settings on your Android device and go to “Connecting & sharing.” The “Private DNS” option should be located here. If you can’t find it, check under “Connections or type it in the settings search bar.”
Step 2: Select “Designated private DNS.”
Step 3: Here, enter the DNS server of your choice. For example, you could enter Cloudflare’s DNS hostname, which is 1dot1dot1dot1.cloudflare-dns.com
Third-party App
To change the DNS server using a third-party app on your Android device, follow these steps:
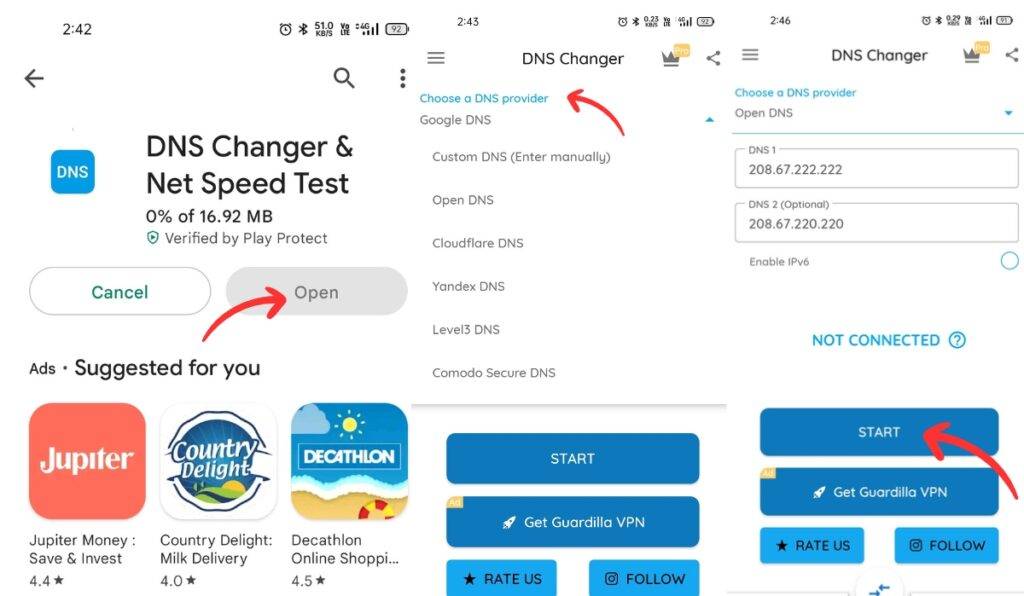
Step 1: Install the DNS Changer app (Free, offers in-app purchases) from the Play Store on your Android device. After installation, open the app.
Step 2: Choose a DNS provider you want to use from the list provided in the app.
Step 3: Finally, tap on “Start” to activate the custom DNS server.
As the app utilizes Android’s VPN API to route all the traffic through the custom DNS server, you will get a pop-up to approve the VPN connection. This app is designed to consume fewer system resources and route traffic locally.
Clear DNS cache on rooted Android devices
Clearing the DNS cache system-wide on Android requires rooting your phone. Once you’ve rooted your device, you can use Termux to flush the DNS cache with a single command. Here’s how to do it:
Step 1: Install Termux from the Google Play Store.
Step 2: Grant root permission to Termux using Magisk.
Step 3: Open Termux and type the following command:
su
ndc resolver clearnetdns wlan0/rmnet0
Step 4: Press Enter to execute the command.
The DNS cache should now be cleared system-wide on your Android phone.
So, these are the ways to clear the DNS cache on your Android Device. If you ever have a problem opening a website on Chrome, use a suitable method to fix your issue. If you want to enhance your Chrome browsing experience, you should check out the Best Chrome Extensions.


